Getting started with ngspice can be quite tricky. It’s a very powerful piece of software and although the user manual is quite comprehensive, its complexity can easily scare off beginners.
Here’s a simple step-by-step tutorial on how to simulate a very simple electronic circuit. It should enable you to run your own simulations of circuits you designed.
Minimal privoxy tor configuration
Privoxy is an extremely versatile and powerful non-caching web proxy. It’s often used in combination with Tor to anonymously surf the web.
The downside to privoxy’s versatility is that it can be very difficult and complex to configure. The Tor wiki however has a nice minimal privoxy configuration example. Assumed Tor listens as SOCKS-proxy on your local host at port 9050 (could be any other host or port, as well), a minimal privoxy configuration file (/etc/privoxy/config) could look like this:
# Generally, this file goes in /etc/privoxy/config
#
# Tor listens as a SOCKS4a proxy here:
forward-socks4a / 127.0.0.1:9050 .
confdir /etc/privoxy
logdir /var/log/privoxy
# actionsfile standard  # Internal purpose, recommended
actionsfile default.action   # Main actions file
actionsfile user.action      # User customizations
filterfile default.filter

# Don't log interesting things, only startup messages, warnings and errors
logfile logfile
#jarfile jarfile
#debug   0    # show each GET/POST/CONNECT request
debug   4096 # Startup banner and warnings
debug   8192 # Errors - *we highly recommended enabling this*

user-manual /usr/share/doc/privoxy/user-manual
listen-address  127.0.0.1:8118
toggle  1
enable-remote-toggle 0
enable-edit-actions 0
enable-remote-http-toggle 0
buffer-limit 4096
To check if Tor is up and running correctly, the Tor project offers a nice little GUI, called Vidalia.
Generating puppet password hashes
Puppet needs user passwords in configuration files to be encrypted in the format the local system expects. For Linux and most unix-like system, that means, you have to put the sha1 sum of the password into the configuration file.
There are quite a few ways to generate those password hashes, e.g.
$ openssl passwd -1
  Password:
  Verifying - Password:
  $1$HTQx9U32$T6.lLkYxCp3F/nGc4DCYM/
You can then take the hash string and use it as password in a puppet configuration (e.g. http://docs.puppetlabs.com/references/stable/type.html#user)
user { 'root':
  ensure           => 'present',
  password         => '$1$HTQx9U32$T6.lLkYxCp3F/nGc4DCYM/',
}
Be sure to put the password in single quotes if it contains a dollar sign ($) to ensure that puppet does interpret those as variables.
Update:
MD5 hashes are not considered secure. In a production environment you most likely want to use a different hash function like SHA-512. To generate a SHA-512 hash, run
$ python -c 'import crypt; print crypt.crypt("password", "$6$salt")'
fish kioslave and “Could not enter folder” error
The kioslave fish:/ enables you to access remote files through ssh, even if sftp is not installed on the remote host. It’s much more convenient than its cousin sftp:/, e.g. because dolphin remembers file associations etc.
Unfortunately, fish:/ requires perl. It copies a perl script to the remote host and executes it there. So if you run into an error like
Could not enter folder fish://root@HOST/root
when you try to point konqueror or dolphin to fish://root@HOST, the culprit could simply be a missing perl package on the remote host. Installing perl-URI should suffice:
# yum install perl-URI
For further debugging of the fish:/ kioslave, have a look at http://techbase.kde.org/Development/Tutorials/Debugging/Debugging_IOSlaves/Debugging_kio_fish
How to list rpm packages from certain repository
Usually, rpm --queryformat can be used to generate all sorts of rpm package listing. You could, for example, use the vendor tag to separate the packages that are tagged with RPM Fusion from the list of all installed packages (rpm -qa):
$ rpm -qa --queryformat "%{Name}:%{Vendor}\n" | grep -F "RPM Fusion"
Unfortunately, there is no 1:1 mapping between rpm’s vendor tag and the install repository. In some cases, the vendor tag is just slightly altered (upper case letters, etc.) or the tag is completely empty.
And there is obviously no rpm tag for repositories, since rpm itself doesn’t know anything about repositories (you can list all available tags by invoking rpm --querytags). But of course, yum does!
To get a list of packages from the RPM Fusion repository, you can use
$ yum list installed | grep -i fusion
Resources:
http://unix.stackexchange.com/questions/22560/list-all-rpm-packages-installed-from-repo-x
http://www.rpm.org/max-rpm/s1-rpm-query-parts.html
KDE global shortcuts daemon stealing shortcuts (aka Netbeans Ctrl+Shift+I doesn’t work any more)
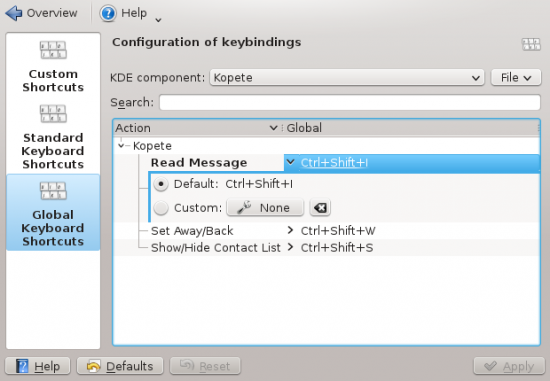
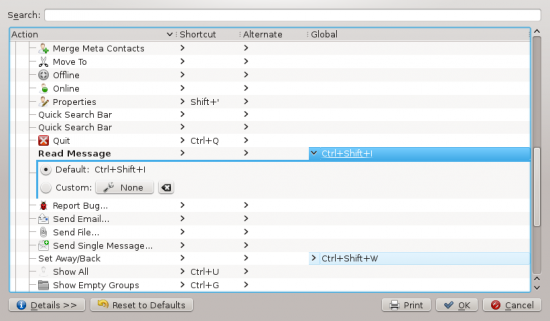
If Netbeans’ keyboard shortcut for fixing import statements (or any other shortcut) stops working, it could be the KDE global shortcuts daemon interfering12. Per default, Ctrl+Shift+I is bound to Kopete’s read message function, so if Kopete runs in background, Netbeans doesn’t catch the shortcut. Quick Fix: Close Kopete or simply remove the global shortcut.
To check, if the kglobalaccel daemon uses Ctrl+Shift+I, simply use
$ grep -i ctrl+shift+i ~/.kde/share/config/kglobalshortcutsrc
ReadMessage=Ctrl+Shift+I,Ctrl+Shift+I,Read Message
You can either just remove the line from ~/.kde/share/config/kglobalshortcutsrc, use KDE’s System Settings tool (System Settings → Shortcuts and Gestures → Global Keyboard Shortcuts → KDE component: Kopete → Read Message)
or unset the shortcut in Kopete itself (Kopete → Settings → Configure Shortcuts → Read Message)
[1] http://netbeans.org/bugzilla/show_bug.cgi?id=117058
[2] http://netbeans.org/bugzilla/show_bug.cgi?id=187776
Okular uses ridiculous amounts of memory
Especially on large pdf files, okular tends to occupy insane amounts of memory. That’s because already rendered pages are kept in the cache for faster revisit and as you scroll quickly through a large pdf (let’s assume a couple hundred pages), okular can easily occopy Gigabytes of RAM for a few MB sized pdf file.
The problem is existing for quite a while and a couple of version now and there is even a bug report in the kde bug tracker. As a quick fix, I would simply suggest to lower okular’s MemoryLevel. Modern processors usually render regular pages (eBooks, datasheets, application notes etc.) almost instantly and as long as you don’t mess around with technical drawings or other render-intensive stuff inside the pdf, there is really no reason to use heap space that aggressively.
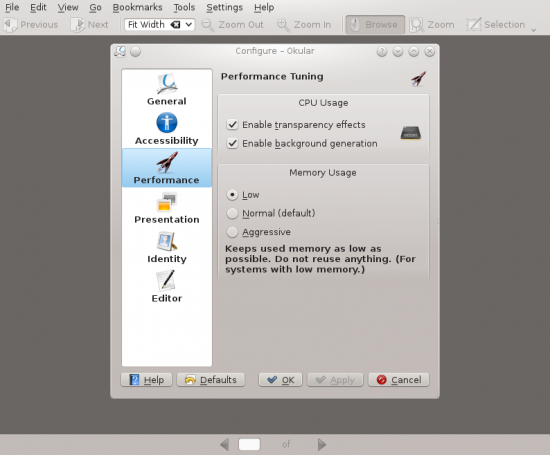
You can either use the GUI (Settings → Configure Okular… → Performance → Memory Usage) to the the Memory Usage to “Low”,
or change the MemoryLevel variable in .kde/share/config/okularpartrc to “Low”. If the variable (or the Dlg Performance-Section) doesn’t exist, simply create it.
[Dlg Performance]
MemoryLevel=Low
ps2psdf, A4 paper, landscape and wrong margins
ps2pdf messes up the paper margins when you run it on a A4 landscape postscript file, because it assumes letter sized paper per default.
To fix this, you can either fiddle around in the shell scripts itself or RTFM and invoke the command correctly:
$ ps2pdf -sPAPERSIZE=a4 myfile.ps myfile.pdf
Error “you have not created a bootloader stage1 target device”
This rather cryptic error may appear during a Fedora 16 installation and simply tries to tell you, that you forgot to create a BIOS boot partition.
If you’re doing a kickstart install, a look at Fedora’s Kickstart wiki page may be helpful. A big yellow alert box essentially tells you to add the following line
part biosboot --fstype=biosboot --size=1
to your kickstart file that used to work with Fedora versions <= 15.
Resources:
Fedora 16 common bugs
https://bugzilla.redhat.com/bugzilla/show_bug.cgi?id=752063
Changing rpmbuild working directory
Usually, rpmbuild related variables are set in ~/.rpmmacros. To change the current working directory, one could simply alter the default settings:
%_topdir %(echo $HOME)/rpmbuild
This would change rpmbuild’s working directory on a per-user basis.
Sometimes it’s quite convenient to keep the default setting and change the working directory on a per-project basis:
$ rpmbuild --define "_topdir workingdir" -ba project.spec
To use the current directory as working directory, one could invoke rpmbuild as follows:
$ rpmbuild --define "_topdir `pwd`" -ba SPECS/project.spec
Careful: Double quotes are mandatory as well as having a proper subdirectory structure in the new working directory (BUILD, SRPM, RPM, SPECS and SOURCES).
Resources:
http://www.rpm.org/max-rpm/s1-rpm-anywhere-different-build-area.html
http://stackoverflow.com/questions/416983/why-is-topdir-set-to-its-default-value-when-rpmbuild-called-from-tcl


