Running Fedora 27 on Google Compute Engine

      2 Comments on Running Fedora 27 on Google Compute Engine

Usually Linux distributions with a long life cycle like RHEL (or its free derivative CentOS), Debian or SLES are the way to go for virtual machines in a cloud environment. But sometimes you need to be a little bit closer to upstream. Maybe because your applications relies on newer version of some packages that are not (easily) available on distributions with long term support or maybe because you need a feature that has just not yet made it to RHEL, Debian or SLES.
In those cases, Fedora is an interesting choice, since it’s probably the Linux distribution that’s closest to upstream and provides the most features that could be considered ‘bleeding edge’. Unfortunately there’s currently no publicly available Fedora image on the Google Cloud Platform. But not to worry, it’s quite easy to run Fedora 27 on GCE.

The Fedora Project provides a compressed raw disk image that can be used to spawn VMs on different platforms, e.g. GCE. To use it with the Google Compute Engine, the image has to be renamed and repackaged though:

wget https://dl.fedoraproject.org/pub/fedora/linux/releases/27/CloudImages/x86_64/images/Fedora-Cloud-Base-27-1.6.x86_64.raw.xz
xz --decompress Fedora-Cloud-Base-27-1.6.x86_64.raw.xz
mv Fedora-Cloud-Base-27-1.6.x86_64.raw disk.raw
tar cfz Fedora-Cloud-Base-27-1.6.x86_64.tar.gz disk.raw --sparse
rm disk.raw

The image can now be uploaded into a Google Cloud Storage bucket:

gsutil mb gs://fedora-cloud-base-27
gsutil cp Fedora-Cloud-Base-27-1.6.x86_64.tar.gz gs://fedora-cloud-base-27/

Now, we can create an image and use that to spawn a GCE instance:

gcloud compute images create --source-uri gs://fedora-cloud-base-27/Fedora-Cloud-Base-27-1.6.x86_64.tar.gz fedora-cloud-base-27
gcloud compute instances create fedora27 --machine-type f1-micro --image fedora-cloud-base-27 --zone us-east1-b

Of course, you might want to choose a different machine-type or zone here.

Once the VM is booted (and assuming a metadata key value pair for the project provides a public ssh key) one can connect to the instance via:

gcloud compute ssh fedora@fedora27
Allow blacklisted VMWare Workstation Player graphics driver

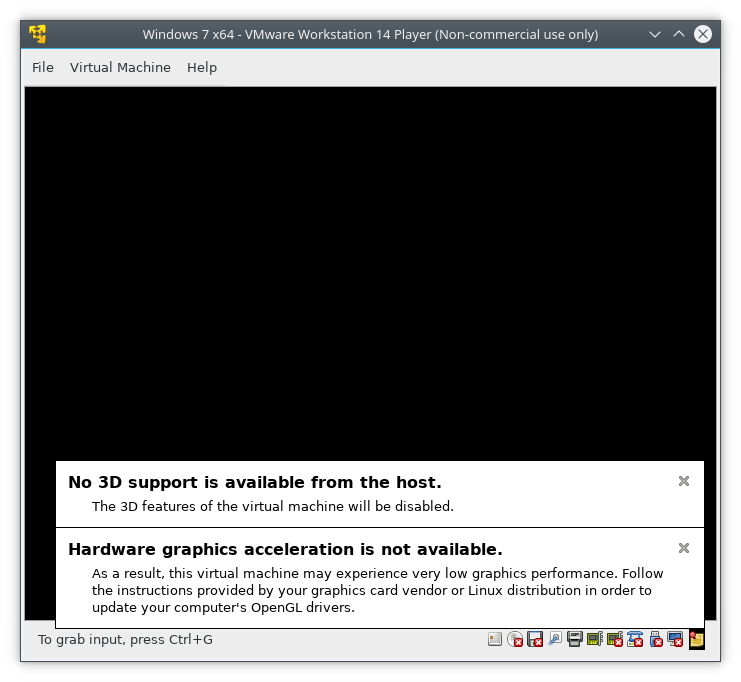
For some reason, VMWare decided to blacklist some graphics drivers for their VMware Workstation Player. That includes the Mesa DRI drivers for most Intel IGPs, which results in unbearably slow graphic performance and potentially error messages such as “Hardware graphics acceleration is not available” or “No 3D support is available from the host” when starting a virtual machine

VMWare Workstation Player showing error message due to blacklisted driver

To enable hardware 3D acceleration for blacklisted drivers, the option mks.gl.allowBlacklistedDrivers needs to be enabled:

...
mks.gl.allowBlacklistedDrivers = TRUE

This can either be done globally in /etc/vmware/config, on a per-user basis in ~/.vmware/preferences or for each individual VM in the corresponding .vmx file.

Arduino development with Eclipse

      No Comments on Arduino development with Eclipse

The Arduino IDE is great for beginners: It makes it really easy to write simple programs without having to care about compiler options, include paths, language standards or how to actually flash firmware onto the microcontroller. It even comes with a built-in serial monitor which can be a great tool for debugging.
Inevitably, as people dive deeper into the world of microcontrollers and the Arduino platform specifically, they usually want more control of the toolchain and use features like referencing source code across different projects and include external libraries. While that’s technically all possible with the Arduino IDE, some of the things might be a bit clunky to set up. IDEs like Eclipse are much more suited for these use cases.

Continue reading

Updating BIOS firmware via iPXE

      No Comments on Updating BIOS firmware via iPXE

These days mainboards usually come with some sort of wizbang tool that allow the user to update the BIOS from a USB drive or straight via network. Except, of course, that one single mainboard that absolutely needs a new BIOS version on a late Friday afternoon. And obviously the manufacturer only provides a flash tool for DOS and the mainboard is not supported by flashrom yet.
In those cases booting FreeDOS can be really handy. Booting FreeDOS via PXE is not that hard and it can also be booted via iPXE quite easily. If you do boot it via PXE, the easiest way to access the mainboard manufacturer’s flash tool and the new BIOS firmware from within FreeDOS is probably to include it in the PXE image file (see here). With iPXE however there’s a much more elegant way…

Continue reading

Migrating a virtual machine from KVM to ESXi

      1 Comment on Migrating a virtual machine from KVM to ESXi

Migrating a virtual machine from one host to another is usually no big deal if both hosts run the same VMM. But what if one wants to move a VM from a host running a different hypervisor than the target host? In the case of moving a VM from KVM to ESXi that’s just not (easily) possible. However, one can convert the virtual hard drive and recreate the virtual machine on the target host, which should be good enough for most use cases.

Continue reading

OpenSSH cipher performance

      3 Comments on OpenSSH cipher performance

The achievable speed of copying a file with OpenSSH (e.g. with scp) will depend on quite a few different factors such as CPU speed, CPU architecture, Network throughput, OpenSSH implementation, OS, hard drive speed, etc. But how much of a difference does choosing a different cipher algorithm make? And what’s the fastest OpenSSH cipher algorithm?

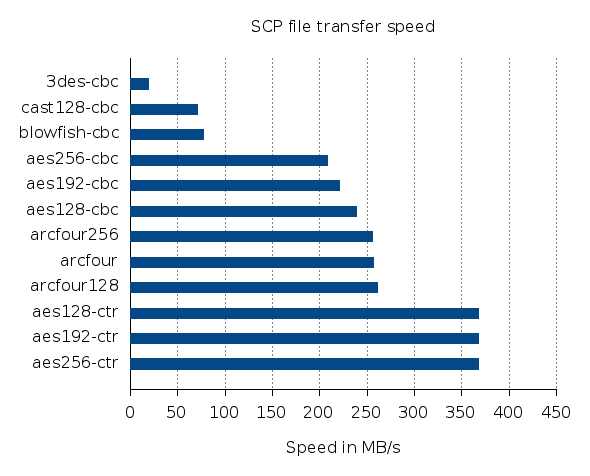
Turns out, there’s no simple answer to this question, since most of the factors that influence the transfer speed can be ruled out, but the results will at least depend on the hardware platform and OpenSSH version. There’s quite a few different benchmarks out there, e.g. for the Bifferbord, E5 xeon CPUs or different consumer grade CPUs and ARM processors. But since the results are so heavily platform dependent, it’s a good idea to run your own benchmark on the particular platform you are interested in. So here’s another data point for an Intel Xeon E5-2640 and OpenSSH 6.9p1 (OpenSSL 1.0.1k).

The test setup is quite similar to the one described at blog.famzah.net. The bash script used to produce the data is:

for cipher in aes128-ctr aes192-ctr aes256-ctr arcfour256 arcfour128 aes128-cbc 3des-cbc blowfish-cbc cast128-cbc aes192-cbc aes256-cbc arcfour
do
   echo "$cipher"
   for try in 1 2
   do
      scp -c "$cipher" /tank/fs/testfile.img root@localhost:/tank2/fs/
   done
done

The test file consists of 5GiB random data. Both the source and target file system are RAM backed to remove the influence of HDD read and write speeds. In addition to that, the test file is written to localhost to ensure that network speed, load and NIC drivers do not influence the test results.

SCP file transfer speed

The results clearly show, that the Xeon’s AES instruction set is used. Most modern x86 CPUs do come with this extension these days.

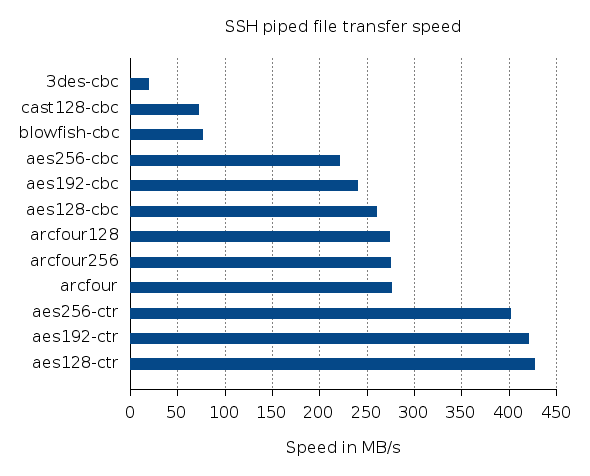
While this data clearly suggests, that AES encryption is the faster cipher OpenSSH cipher (if there is hardware support for it as in this case), copying large amounts of data with scp is not a particularly interesting use case. Sending big streams of data through a pipe into ssh, as you do when you send and receive ZFS snapshots over ssh, is a very common application. For benchmarking reasons, sending actual ZFS snapshots is not ideal, since ZFS takes some extra time to check the receiving file system (and its snapshots) before starting the sending process. So here’s an altered script that should tell us, what the fastest cipher for that particular use case is:

for cipher in aes128-ctr aes192-ctr aes256-ctr arcfour256 arcfour128 aes128-cbc 3des-cbc blowfish-cbc cast128-cbc aes192-cbc aes256-cbc arcfour
do
   echo "$cipher"
   for try in 1 2
   do
      cat /tank/fs/testfile.img | pv | ssh -c "$cipher" root@localhost "cat - > /dev/null"
   done
done

The only difference can be found in the highlighted line: Instead of using scp the file is now piped directly into ssh and discarded on the receiving side. Again, the 5GiB test file lives on a RAM backed file system and the transfer is done to localhost.

SSH piped file transfer speed

Netbeans’ tomcat log file path

      No Comments on Netbeans’ tomcat log file path

Spawning a tomcat server instance from within Netbeans is really handy for rapid Java Servlet or JavaServer Pages application development. Since log levels are usually quite verbose during development, logs tend to pile up. So you might want to clean out the log directory from time to time. Or maybe you just want to go through one of those logs one more time with a proper editor.
Here’s Nebeans’ default tomcat log file storage location:

~/.netbeans/<netbeans-version>/apache-tomcat-<tomcat-version>_base/logs

So for a current Netbeans with a recent tomcat version this could be something like ~/.netbeans/8.1/apache-tomcat-8.0.27.0_base/logs/

Creating a zfs pool on RAM backed block devices

Especially for performance benchmarks it can be quite handy to have a zfs pool that’s not limited by the speed of the underlying hard drives or other block devices (like iSCSI or fibre channel). The Linux kernel has a nice block device driver that let’s you create virtual block devices that are RAM backed. To list the available options, use modinfo

# modinfo brd
[...]
parm:           rd_nr:Maximum number of brd devices (int)
parm:           rd_size:Size of each RAM disk in kbytes. (int)
parm:           max_part:Num Minors to reserve between devices (int)

To create three virtual block devices with a size of 2GiB each for example, load the brd module with the following options

# modprobe brd rd_nr=3 rd_size=2097152

which will create three devices named /dev/ramN:

# ls -lah /dev/ram*
brw-rw---- 1 root disk 1, 0 Apr 30 00:34 /dev/ram0
brw-rw---- 1 root disk 1, 1 Apr 30 00:34 /dev/ram1
brw-rw---- 1 root disk 1, 2 Apr 30 00:34 /dev/ram2

Note that the default value for the rd_nr parameter is 16, which would result in 16 /dev/ramN devices being created. However, the memory is still available until those virtual block devices are actually used.

Creating a zfs pool on these RAM backed block devices works just as with any other block device:

# zpool create tank ram0 ram1 ram2
# zpool status
  pool: tank
 state: ONLINE
  scan: none requested
config:

        NAME        STATE     READ WRITE CKSUM
        tank        ONLINE       0     0     0
          ram0      ONLINE       0     0     0
          ram1      ONLINE       0     0     0
          ram2      ONLINE       0     0     0

errors: No known data errors

# zpool list
NAME   SIZE  ALLOC   FREE  EXPANDSZ   FRAG    CAP  DEDUP  HEALTH  ALTROOT
tank  5,95G   224K  5,95G         -     0%     0%  1.00x  ONLINE  -

Reading from and writing to a filesystem on this RAM backed pool should be quite fast

# zfs create tank/fs
# dd if=/dev/zero of=/tank/fs/testfile.img bs=1M count=5k
5120+0 records in
5120+0 records out
5368709120 bytes (5,4 GB) copied, 2,51519 s, 2,1 GB/s

Since the actual performance (throughput as well as IOPS) is heavily depending on the actual hardware, your mileage may vary here, of course. Please also keep in mind that writing zeros to a file with dd is a quick and easy way to get a first ballpark number, it is not a proper performance benchmark however. You might want to have a look at bonnie++ et al. for that.

Change keyboard configuration in console

      No Comments on Change keyboard configuration in console

To temporarily change a console’s keyboard mapping there’s loadkeys, a little user space program that allows you to alter the kernel’s keyboard mapping.
Loading the very handy US International keyboard layout, use

# loadkeys us-intl

To list the currently used keyboard layout or all available keyboard layouts, localectl can be used

# localectl status
   System Locale: LANG=en_US.UTF-8
       VC Keymap: us-altgr-intl
      X11 Layout: us
# localectl list-keymaps
[...]

If localectl is not available, keyboard mapping files are usually found at /lib/kbd/keymaps/xkb/ (e.g. Fedora) or /usr/share/kbd/keymaps/ (e.g. Arch Linux).

To permanently change the default keyboard layout system-wide, alter /etc/vconsole accordingly

KEYMAP="us-altgr-intl"
FONT="eurlatgr"

Convert a JAR file into a Linux executable

      No Comments on Convert a JAR file into a Linux executable

With Java programs it’s quite common to combine several classes into one JAR archive. Java libraries are typically distributed this way as well.
On Linux platforms, people are quite used to using command line programs, but sometimes it’s handy to distribute a java program as an executable file that can be run by a simple double-click instead of opening a terminal and typing java -jar FancyProgram.jar. Of course, one could always configure the desktop environment to associate JAR files with the corresponding executable from the Java Runtime Environment, but adding the JAR archive as a payload to a common shell script is much more universal.

Here’s a small stub of code that will launch the Java interpreter (i.e. the binary called java) with itself as the JAR file to run.

#!/bin/sh
MYSELF=`which "$0" 2>/dev/null`
[ $? -gt 0 -a -f "$0" ] && MYSELF="./$0"
java=java
if test -n "$JAVA_HOME"; then
    java="$JAVA_HOME/bin/java"
fi
exec "$java" $java_args -jar $MYSELF "$@"
exit 1

To add the original JAR archive as payload and make the resulting file executable, run

cat stub.sh FancyProgram.jar > FancyProgram && chmod +x FancyProgram

You can now execute the resulting file with ./FancyProgram.

Binary payloads in shell scripts also allow you do distribute entire software packages that could easily consist of hundreds of files as a single shell script, as described in a great article from linuxjournal.com. To wrap JAR archives in native Windows executables, have a look at http://launch4j.sourceforge.net.

Resources:
https://coderwall.com/p/ssuaxa/how-to-make-a-jar-file-linux-executable