Viewing package changelogs with yum

      No Comments on Viewing package changelogs with yum

To quickly review the latest changes to an rpm package, there’s a handy plugin for yum called yum-changelog. It’s part of the Fedora repository and can be installed by invoking

# yum install yum-plugin-changelog

The usage is quite self-explanatory, but here a a few useful examples anyway:

To list the whole changelog history of a package, run

# yum changelog all <packagename>

To list the changelog of a specific time period, e.g. this year:

# yum changelog 2013-01 <packagename>

To list the changelog of packages about to be updated:

# yum update <packagename> --changelog

Updating STK500 firmware

      No Comments on Updating STK500 firmware

Unfortunately, Atmel does not ship a hex file for their STK500 development system that could be used to update the firmware using 3rd party tools like avrdude. Instead, an encrypted ebn-file comes with the latest Atmel Studio. The tools that is used to flash the firmware onto the ATmega8535 is a bit dull, though.

Preparing serial connection

First, hook up the DB9 port on your STK500 that is marked as RS232 CTRL to your PC. Since the flash tool AvrProg.exe only searches for devices on COM1, make sure that you connected it to COM1 or if you use a USB-to-Serial converter, change its address to COM1 (Device Manager → Right-click on the COM port you wish to reassign → Properties → Port Settings → Advanced → COM Port Number → COM1). The port settings should read as 9600 8N1.

Preparing the STK500

Now, power off the STK500 and make sure, the push button labeled PROGRAM is pressed while turning on the power again. The LED labeled STATUS shouldn’t be lit permanently (like it would in normal operation mode).

Flashing the firmware

Startup Atmel’s flash tool AvrProg.exe that is installed along with Atmel Studio. The default installation location is %ProgramFiles%\Atmel\AVR Tools\AvrProg\AvrProg.exe.
%ProgramFiles% is localized and depends on your architecture. It’s most likely going to be C:\Program Files or C:\Program Files (x86).

Load the firmware file using the 'Browse' button and flash it.

Load the firmware file using the ‘Browse’ button and flash it.

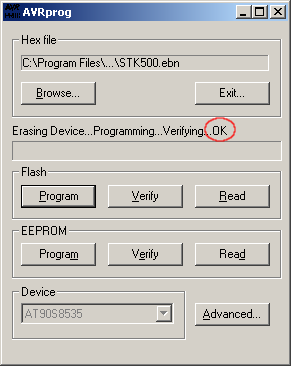
Next, load the STK500.ebn firmware file by pushing the Browse button. The default location is %ProgramFiles%\Atmel\AVR Studio 6.0\tools\STK500\STK500.ebn. After hitting Flash → Program, a progress bar should appear and shortly after the status indicator should tell you that the devices has been successfully programmed.

Device was successfully programmed.

Device was successfully programmed.

If you restart the STK500 by turning off the power and turning it back on again, the firmware should be up and running. You can double-check with avrdude, for example.

$ avrdude -p atmega32 -c stk500v2 -P /dev/ttyUSB0 -n -v
[...]
         Programmer Type : STK500V2
         Description     : Atmel STK500 Version 2.x firmware
         Programmer Model: STK500
         Hardware Version: 2
         Firmware Version Master : 2.10
         Topcard         : Unknown
         Vtarget         : 5.1 V
         SCK period      : 10.9 us
         Varef           : 5.0 V
         Oscillator      : 3.686 MHz

Re-enabling KDE touch pad

      7 Comments on Re-enabling KDE touch pad

As I wrote in an earlier post, the ambient light button on HP EliteBooks is per default mapped to switch off the touch pad. Since it’s placed right next to the function keys that increase or decrease the screen brightness, it happens quite often that the key is hit by accident.

If you’re running KDE, hitting Fn+F11 not only switches off the touch pad. You can’t even re-enable it with the System Settings manager, since System Settings -> Input Devices -> Touchpad manipulates ~/.kde/share/config/kcmtouchpadrc but the touch pad is disabled in ~/.kde/share/config/ktouchpadenablerrc.

To re-enable the touch pad, open ~/.kde/share/config/ktouchpadenablerrc with an editor and change it to

[general]
touchpadEnabled=true

Fixing HP EliteBook ambient button

      2 Comments on Fixing HP EliteBook ambient button

The button that is supposed to toggle the ambient light sensor on HP EliteBooks 8440p and 8460p per default switches off the touch pad. That is because Fn+F11 (scancode 0x33), which is the ambient light button, is incorrectly mapped to KEY_TOUCHPAD_OFF (keycode 193) in kernel.

To remap the scancode to another keycode, you can use setkeycodes. An appropriate choice for a target keycode could be KEY_PROG1 (XF86Launch1, keycode 148) which can be easily reconfigured in KDE or any other desktop environment to run any custom command.

Run the following command as root to remap Fn+F11 to KEY_PROG1:

# setkeycodes e033 148

Resources:
http://www.linlap.com/hp_elitebook_8460p

C/C++ compound binary logic operations

      No Comments on C/C++ compound binary logic operations

I’ve always had trouble reading and understanding compound binary operations fluently. Whenever they appear in a piece of code, I have to decode them to actually understand what they are doing. This is mainly due to the fact that I infrequently work close to hardware were heavy bit manipulation is a daily occurrence. I won’t bother you with the truth tables of regular bitwise operators, but here’s list of combined bit operations that come in quite handy:

Setting a bit

foo |= 0x01;

The OR operation is used to set a particular bit that is specified in a BIT MASK. The bit mask is usually specified in hex. In this example it is 0x01 which indicates the first bit.

Clearing a bit

To clear bit 0 in foo, two different bit operations are required:

foo &= ~0x01;

This example uses the AND and the NOT operator. The NOT operator is used, because most programmers like to specify a mask, wherein the bit that should be changed, is set. You could of course just use a mask, wherein the bits that should be changed are unset, therefore eliminating the requirement for the NOT operator (note that this is highly uncommon though).

Flipping a bit

Another very useful tool is the XOR operator:

foo ^= 0x01;

This toggles the first bit, independent of its current state and leaves all other bits unchanged.

Checking if a bit is set

Because a statement anything other than zero is considered TRUE in C/C++ (and probably every other programming language, too), you can use

if(foo & 0x01) {
  (...)
}

to check, whether the first bit is set or clear.

Dynamically building a bit mask

Because it is much easier to specify the bit number that should be changed rather than the actual bit mask, programmers usually build up the bit mask dynamically. This is done by left-shifting 0x01 n-times. For example, to build a bit mask that has bit number 7 set, you left-shift 0x01 seven times:

(0x01 << 7)

To build a bit mask that has the first bit (bit number 0) set, you’d shift 0x01 zero times:

(0x01 << 0)

Accessing PL2303 USB serial adapter as non-root user

If you plug the PL2303 USB to serial adapter (or any other FTDI-like USB adapter) into your USB port, udev creates a /dev/ttyUSBX device with limited read and write permissions (0660 per default). Usually, only the root user and a specific group can access the device at all . To access the device as a regular user, you can either become a member of that group (distribution specific, dialout on fedora) or tell udev to create the device with different read and write permissions.

Become a member of dialout

Simply run

# usermod -a -G groupname username

to add the user username to the group groupname. To verify, that a certain user is a member of a specific group, you can grep the file /etc/group for a user name

# grep username /etc/group

Note that you have to re-login for this changes to take effect.

Create the device with different permissions

Alternatively, you can tell udev to create the /dev/ttyUSBX device with different read and write permissions. Add a udev rule to /etc/udev/rules.d/, e.g. /etc/udev/rules.d/85-PL2303SerialPort.rules with the following content:

ATTRS{idVendor}=="067b", ATTRS{idProduct}=="2303", MODE="0666"

You can get the vendor and product id from lsusb or by looking at /var/log/messages when you plug in the device.

After saving the new udev rule, tell udev to reload it’s ruleset

# udevadm control --reload-rules

and eventually plug in your adapter.

How to label a partition

      No Comments on How to label a partition

Labelling a partition can be quite handy, especially for partitions on usb drives that usually get auto-mounted to a folder that corresponds to their label.

Usually the label is set when the partition is created. If the label is not explicitly specified, it is usually auto-generated. To change the label, there are a couple of tools available:

ext2/ext3/ext4 partitions

You can either use e2label

# e2label device [newlabel]

or tune2fs

# tune2fs -L [newlabel] device

FAT/FAT16/FAT32 partitions

Again, there are multiple tools available, from simple perl scripts to mtools, but the easiest to use is probably dosfslabel from the dosfstools package

# yum install dosfstools
[...]
# dosfslabel device [newlabel]

NTFS partitions

ntfslabel is available as part of the ntfsprogs package

# yum install ntfsprogs
[...]
# ntfslabel device [newlabel]

Inserting arbitrary unicode characters to kwrite

While you can normally insert arbitrary unicode characters to any X11 application using Ctrl-Shift-u and four hex digits, it doesn’t work in kwrite or kate. Instead you’d have to press F7 to switch to command line and type in

char <unicode>

For example, to get the degree symbol (Unicode: U+00B0) you’d type in 'char 176' (176 being 0xB0 converted do decimal).

Search for a package containing a certain file

Assumed you want to find the package that contains the shared object libGLU.so.1, e.g. because a binary is dynamically linked against it, and ldd tells you that the shared library requirements are not met. On Fedora (or any yum-type os) you’d run

$ yum whatprovides */libGLU.so.1

and yum would tell you, that mesa-libGLU comes with /usr/lib64/libGLU.so.1 which could fulfill your need (could because you could also be missing the i686 version of the package, depending on your binary).

The Ubuntu way of achieving the same thing:

$ apt-file search libGLU.so.1

And of course the corresponding package would be libglu1-mesa on any recent Ubuntu os.