Upgrading your BIOS on linux

      3 Comments on Upgrading your BIOS on linux

It was already quite some time ago that flashrom 0.9.0 was released by the coreboot-project developers, but anyway…

Flashrom is a utility for identifying, reading, writing, verifying and erasing flash chips. Since Fedora already contains flashrom, there is no need to compile it yourself. Simply pull it from the repo:

yum install flashrom

Usage is rather simple. For a list of all flags and options refer to the manpage. To check if you motherboard is supported, have a look at the coreboot wiki.

NXclient and broken keymap

      1 Comment on NXclient and broken keymap

Currently, NXclient has some problems with handling the keyboard correctly on “newer” X-implementations (such as Fedora 10 and 11). Keys like the arrow keys or backspace are misinterpreted or don’t work at all.

A quick workaround to fix (at least most of) the keys

setxkbmap -model evdev -layout your_layout

on the server side.

Using a ResourceBundle for localization

      No Comments on Using a ResourceBundle for localization

There is a nice java tutorial from Sun how to use ReseouceBundle for localization: http://java.sun.com/docs/books/tutorial/i18n/resbundle/propfile.html.

It’s actually rather simple: Just create a new ResourceBundle object by invoking the getBundle method, specifying the base name and Locale:

ResourceBundle labels = ResourceBundle.getBundle("LabelsBundle", currentLocale);

The getBundle method first looks for a class file that matches the base name and the Locale. If it can’t find a class file, it then checks for properties files. When the getBundle method locates the correct properties file, it returns a PropertyResourceBundle object containing the key-value pairs from the properties file.

To retrieve the translated value from the ResourceBundle, invoke the getString method as follows:

String value = labels.getString(key);

Automating GnuPG

      No Comments on Automating GnuPG

If you want to use GnuPG in a script and don’t want to be prompted for the passphrase, put the passphrase in a file called passphrase.txt and use this to encrypt:

gpg --passphrase-fd 3 -c 3< passphrase.txt < filename > filename.gpg

Of course, you can also use echo to specify your passphrase

gpg --passphrase-fd 3 -c 3< <(echo "secret") < filename > filename.gpg

or you can pipe a tarball into gpg

tar -cf - dir/ | gpg --passphrase-fd 3 -c 3< <(echo "pass") > backup.tar.gpg

or even send a gpg encrypted tarball via e-mail

tar c dir/ | gpg --force-mdc -ac -o - --passphrase-fd 3 -c 3< <(echo "pass") | mail user@domain.tld

Note that you have to use the --batch flag if you want to run gpg from a cron script. (Otherwise gpg tries to read from /dev/tty that doesn’t exist for cron jobs)1.

More GnuPG hacks can be found here: http://www.linuxjournal.com/article/8732


[1] http://stackoverflow.com/questions/39867/how-to-run-gpg-from-a-script-run-by-cron


Working with lzma tarballs

      No Comments on Working with lzma tarballs

The Lempel-Ziv-Markov chain algorithm is a (at least in the Linux-world) relatively new compression method. It features a very high compression ratio that is generally much higher than bzip21. Unfortunately there a quite a few different implementations. So creating and extracting lzma archives on different Linux distrubutions will vary.

While the latest Fedora comes with GNU tar 1.22, which has a built-in flag for lzma compression, CentOS still uses GNU tar 1.15.1; So you will have to pipe your tarball manually to the lzma binary. Here is an example:

On Fedora 11, creating an lzma compressed tarball is rather simple:

tar cfv backup.tar.lzma a/dir --lzma

Just like decompressing it

tar xfv backup.tar.lzma --lzma

You may want to skip the verbose flag v in a script.

On CentOS 5.3 you first have to pull lzma from a 3rd party repository like RPMFusion

yum install lzma

before you can create you archive with:

tar cv a/dir | lzma -c -z > backup.tar.lzma

For decompression, just pipe the hole file into lzma -d and un-tar the output:

cat backup.tar.lzma | lzma -d | tar xv

Again: You may want to skip the verbose flag v in a script.


[1] http://www.linuxjournal.com/node/8051/print

Convert filenames from iso-8859-1 to utf-8

Just as you can convert entire files from one charset to another, you can convert the filenames. For example:

convmv -f iso-8859-15 -t utf-8 -r .

would recursively convert all files in the current directory from iso-8859-1 charset into utf-8. Well, not exactly. To finally rename the files you need the --notest flag. Otherwise convmv will perform a dry run without any changes.

Running a script on shutdown

      No Comments on Running a script on shutdown

It’s rather easy to run a command or a script on boot without going through the full Sys V style init stuff. /etc/rc.local is executed after the init scripts on boot, but unlike BSD, Linux doesn’t have a rc.shutdown.

So how can we execute a command on shutdown? Usually, /etc/init.d/halt is used for shutting down, which calls /sbin/halt.local (if it exists). So we simply add our commands to /sbin/halt.local:

# echo "YOUR_COMMAND" >> /sbin/halt.local

Note that if the file does not exist, you have to add a shebang (e.g. #!/bin/sh) and make it executable (chmod +x /sbin/halt.local)

Unlocking a luks volume with a USB key

      9 Comments on Unlocking a luks volume with a USB key

A luks encrypted disk partition is great. The only thing that can bug you from time to time is that you have to specify the key before you can use it. Or maybe, if you try to mount the volume with /etc/fstab, you’ll be prompted for the password during boot.

Wouldn’t it be great, if you could use a real key to unlock your encrypted volume? Not a keyfile, but a physically existent key like the ones you use to unlock your front door?!

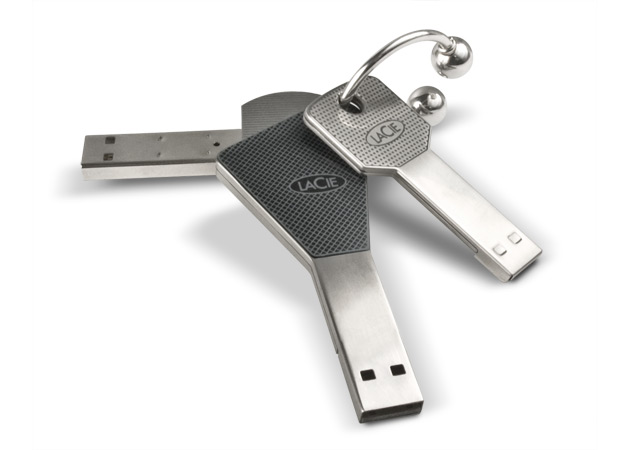
Well, it’s not actually a key, but these LaCie USB Flash Drives come very close:

LaCie iamaKey USB Flash Drives

This article will show you, how to generate a random key for your luks encrypted volume, hide it on any USB flash drive and use udev to unlock and mount your luks volume whenever you plug this flash drive into a USB port

Continue reading

Using udevadm to gather information about specific device

Usually, udevadm requires the sysfs device path of the device in question. But you can also ask udevadm which device path belongs to a certain device node. This gets really helpful if you combine these two queries.

Example: You want to get a list of attributes for a specific device. You do not know the complete device path; all you know is the device node /dev/sdb:

# udevadm info -a -p  $(udevadm info -q path -n /dev/sdb)

A nice document describing how to use this information to write udev rules can be found on http://www.reactivated.net/writing_udev_rules.html.